fat bottom

fat bottom

Tuesday, November 30, 2010

a yummy daring bakers crostata


first off, i hope everyone had a wonderful and spectacular thanksgiving holiday full of family, friends and great memories... i know mine was... it truly was a wonderful weekend... there was some wonderful news for everyone, my brother and sister-in-law are expecting a baby! wahoooo!!! i cannot believe my big brother is going to be a daddy... i am beyond excited for them!! what would have been the buttercream on the cake would have been if my little sister was sitting around my parents table with us, instead of being miles and miles away in greece... but she will be home for christmas... i'm going to give a big wahoooo for that too!! :)

but now... onto the baking...

this months daring bakers challenge (i know i know, i am late in posting... please please forgive me! but i'm finally back to my normal routine)... but as i was saying, this months challenge was hosted by a talented woman named Simona from the baking blog
briciole, check her out... and she chose a wonderful and very versatile crostata, or tart... and the base of this tart was a yummy sweet dough called pasta frolla... which is a crust made of flour, sugar, butter and eggs... and the possibilities for filling a crostata are endless... from fruits, custards and pastry creams, to chocolate, nuts and preserves... i could go on and on... but i won't... i'll just get down to the dessert...

i chose to fill my crostata with some yummy vanilla pastry cream, and topped it with some bananas (half caramelized, and half covered in vanilla sugar and then burnt to yummy perfection with my little blow torch)... ahh... delicious... and it was quite refreshing, and light... which was much needed after a full weekend of gluttonous feasting :)


pasta frolla (version 1)
ingredients
:

1/2 cup minus 1 tablespoon superfine sugar or a scant 3/4 cup of powdered sugar
1 and 3/4 cup unbleached all-purpose flour
pinch of salt
1 stick (8 tablespoons) cold unsalted butter, cut into small pieces
grated zest of half a lemon
1 large egg and 1 large egg yolk, lightly beaten in a small bowl

directions:
1. put sugar, flour, salt, and lemon zest in the food processor and pulse a few times to mix
2. add butter and pulse a few times, until the mixture has the consistency of coarse meal
3. empty food processor's bowl onto your work surface
4. make a well in the center of the mounded flour and butter mixture and pour the beaten eggs into it (reserve about a teaspoon of the egg mixture for glazing purposes later on – place in the refrigerator, covered, until ready to use)
5. use a fork to incorporate the liquid into the solid ingredients, and then use your fingertips
6. knead lightly just until the dough comes together into a ball
7. shape the dough into a flat disk and wrap in plastic wrap.. place the dough in the refrigerator and chill for at least two hours

i then rolled it out and fit it to my tart pan, cut off the excess dough, and then blind baked it for about 20 minutes or so at 350, and it was a nice golden brown... once cooled i filled the tart with vanilla pastry cream and topped with my caramelized and bruleed bananas... and with the excess tart dough, i cut out some star shapes and baked them until they were a nice golden brown...


well i hope everyone had a happy thanksgiving... and as always happy baking everyone!

Tuesday, November 23, 2010

pumpkin mousse pie with a gingersnap cookie crust

well, since thanksgiving is literally right around the corner, i had to try a few more ideas when it came to deciding what i'm going to bake for our big family stuff-fest... a few weeks ago i played around with a pumpkin mousse pie, and i was overly satisfied with the results... but i wanted to try a few little variations, to make it just right...

so, i ditched the flaky pie crust, and went with a crunchy gingersnap crust... stabilized the mousse with a little gelatin, and instead of caramel under the mousse, i used it as a garnish, along with simple vanilla whipped cream, and a few sprinkles of roasted siagon cinnamon...

and the results... amazing... but i'm still not sure if this will be the final blueprint for my mousse pie... i know i'm sticking with the gingersnap crust instead of the doughy crust... and defiantly using the stabilized version of the mousse, but as for toppings... i'm still up in the air...

gingersnap pie crust:
about 8 ounces gingersnap cookies (about 32 cookies), coarsely broken
1/4 cup (1/2 stick) salted butter, melted
directions:
1. preheat oven to 325, finely grind the gingersnap cookies in processor (yielding 1 1/2 to 1 2/3 cups)
2. add melted butter and process until moistened, then press crumb mixture firmly onto bottom and up sides of 9-inch-diameter tart pan with removable bottom
3. place pan on rimmed baking sheet, and bake the crust for about 8-10 minutes, then let cool

for the pumpkin mousse:

ingredients for the pumpkin mixture:
1 cup pumpkin
2 tbsp. cinnamon
1 tsp. nutmeg
a dash of clove
1/2 tsp. ginger

ingredients for the stabilized whipped cream:
1 teaspoon unflavored gelatin
4 teaspoons cold water
1 cup heavy whipping cream
1/4 cup confectioners sugar

directions:
1. in a small pan, combine gelatin and cold water; let stand until thick
2. place over low heat, stirring constantly, just until the gelatin dissolves
3. remove from heat; cool (do not allow it to set)
4. whip the cream with the confectioners sugar, until slightly thick
5. while slowly beating, add the gelatin to whipping cream
6. whip at high speed until medium-stiff peaks form
7. carefully fold in pumpkin mixture, fold until well combined
8. spread evenly into now cooled tart shell, and chill until until set


lets get ready for a happy thanksgiving... and happy holiday baking everyone!

Monday, November 22, 2010

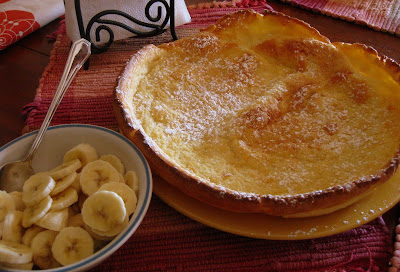
have you ever had a dutch baby??

this past weekend was just wonderfully filled with relaxation and hanging about with my hubby and my two little guys, it's just what we needed before the crazy holiday season begins... so on saturday morning, while the boys were busy sprawled about the living room with matchbox cars and legos, the hubby and i, with coffee's in hand enjoyed a few episodes of america's test kitchen... i'm a dork for christopher kimball... and one of the segments was about a delicious breakfast goodies known as a "dutch baby"... or what are more commonly referred to as a german pancake, which is very similar to yorkshire pudding...

but back to the show... now, let me tell you, as soon as they pulled the finished product out of the oven, my hubby and i had the same expression on our faces... we had one of those unspoken connective moments... we knew what we were having for breakfast... so, off to the store for lemons the hubby went... and an hour or so after that, the dutch baby was born...

this was deliciously flavorful, had a wonderful mix of textures, from almost custardy in the center, but with nice crispy edges... the lemon flavor was subtle, and the dusting of powdered sugar gave it just that kick of sweetness you would want...


ingredients:
2 tablespoons vegetable oil
1 cup all-purpose flour
1/4 cup cornstarch
2 teaspoons grated zest and 2 tablespoons juice from 1 lemon
1 teaspoon salt
3 large eggs
1 1/4 cups skim milk (see note)
1 tablespoon unsalted butter , melted and cooled
1 teaspoon vanilla extract
3 tablespoons confectioners' sugar

directions:
1. adjust oven rack to middle position and heat oven to 450 degrees
2. brush surface and sides of large skillet with oil, then place skillet on oven rack and heat until oil is shimmering, about 10 minutes
3. meanwhile, combine flour, cornstarch, lemon zest, and salt in large bowl
4. whisk eggs in another bowl until frothy and light, about 1 minute
5. then whisk milk, butter, and vanilla into eggs until incorporated
6. whisk one-third of milk mixture into flour mixture until no lumps remain, then slowly whisk in remaining milk mixture until smooth
7. carefully pour batter into heated skillet just pull the oven rack out a little and pour into the pan, it's a lot easier) and bake until edges of the dutch baby are deep golden brown and crisp, about 20 minutes
8. transfer skillet to wire rack and sprinkle Dutch Baby with lemon juice and confectioners’ sugar... cut into wedges... serve


next time you're making brunch, put this guy on your menu... it's light, delicious, and the perfect start to a wonderful weekend :)
hope you all enjoyed your weekend... and as always, happy baking everyone!

Wednesday, November 17, 2010

outrageous brownies...


mmmm... those look delicious don't they... my teeth are just aching from how sweet these brownies are... they are just pure indulgence... deep rich fudgy brownies, topped with salt caramel, dark chocolate ganache, pecans and chocolate chips and toffee chips... whew...now that's a taste overload...
somehow my brownies went from just plain ol' brownies... to turtle brownies... to outrageous... and let me tell you... these are amazing...

fudgy brownies
ingredients:

4 oz unsweetened chocolate, finely chopped
8 tablespoons butter
1 1/2 cup sugar
1/4 teaspoon salt
2 teaspoons vanilla extract
2 large eggs
4 1/2 oz flour (about 1 cup)
2 tablespoons natural cocoa (not Dutch-processed)

directions:
1. preheat the oven to 350 degrees, and grease a 9x9 pan and set in parchment paper, letting the two ends hang over the edge and grease the parchment
2. place the chopped chocolate and the butter in a metal bowl, and set it over a double boils, stir the mixture until the smooth and the chocolate has melted completely
3. remove from the heat and let cool slightly, then whisk in the sugar, salt, and vanilla, then add in the eggs, one at a time, stirring until combined and smooth
4. sift in the flour and cocoa, and whisk into batter to combine
5. scrape the batter into the pan and smooth the top with a rubber spatula, then bake brownies 30-40 minutes, or until a toothpick inserted into the center comes out clean
6. let the brownies cool in the pan for a few minutes, then lift the brownies out of the pan, transfer them to a wire rack and let cool completely before cutting into bars

for salt caramel topping:
ingredients:

1 cup sugar
1/4 cup water
2 tablespoons light corn syrup
3/4 cup heavy cream
4 tablespoons unsalted butter
1 1/2 teaspoons sea salt
1 tsp. vanilla extract *optional, but i always use it :)

directions:
1. in a medium saucepan, combine the sugar, water and corn syrup and bring to a boil
2. using a wet pastry brush, wash down any crystals on the side of the pan
3. boil over high heat until a deep amber caramel forms, about 6 minutes
4. remove the saucepan from the heat and carefully whisk in the cream (this will bubble up so be careful!), followed by the butter and salt, then vanilla extract
5. let the caramel cool to room temperature before using


for brownie assembly:
well... just go bananas... cover them with as much or as little of your choice of toppings... my choices: pecans, toffee and chocolate chips, ganache and lots of ooey gooey caramel... what a feast! :) but just be careful... a little sliver of these goes alooooooooong way... :)

hope you enjoyed this bit of indulgence... and as always...

happy baking everybody! :)

Monday, November 15, 2010

sweet tooth sunday... cinnamon rolls :)

so yesterday was a bit of a lazy day for me... my hubby had work, so it was just me and the two little guys... who, by the way, had been up the night before WAY past their bed time... so i deemed Sunday to be movie and pajama day... i love that day :) especially when you have two rambunctious boys on your hands... i think pajama day should be a monthly holiday...
well anyways, i asked my oldest little guy what sweet treat he wanted me to make up... and at first he said ice cream, but once i told him it would take a little while to make, he quickly changed his mind to cinnamon rolls... and i jumped all over that... what's better then warming up a house on a cold day with the sweet smells of cinnamon... wanna know what's even better... eating these sweet bad boys, wrapped up in blankets with my two little guys, and watching toy story3 (which by the way... tear-jerker)... but hey, it's all about making memories people...

now, this recipe was new for me in the cinnamon roll world... instead of using my go to recipe, i decided to use the beignet recipe i used a few posts ago... i was so pleased with the way the beignets came out, that i figured why not try using the dough for something like cinnamon rolls... i know, i know, it's not a huge revelation in the baking world... but it worked for me :)
these babies came out soft, springy (can i use that word to describe baked goods?), flaky, and darn it... just plain delicious... and the sweet buttery filling was insanely good! brown sugar, cinnamon, nutmeg and just a hint of ginger... mmmm... too bad i ate one a few minutes ago, cause now i'm feigning for another...
and i decided not to drench these guys in too much frosting... just a smear of sweet vanilla creamcheesie heaven...
don't you wanna just like the screen...
hope that satisfied your sweet tooth, cause it sure did satisfy mine... and as always...
happy baking everyone :)

Saturday, November 13, 2010

rum soaked vanilla cakes... three ways

well hi there! today i'm bringing you a sweet treat for a cold day, well... that's a lie... because any day will do for these bad boys... i'm talking about sweet, buttery pound cakes that have been well fed and fattened up with some seriously good aged dark rum... how's that sound... interested?? you should be... these are some serious good eats...

i haven't made a pound cake in a while, but this recipe yielded a delicious and moist cake with a nice tight crumb... wanna know something, i just started giggling to myself... that sentence kinda sounds dirty... if you knew me, you'd know my sense of humor is a bit on the naughty side...

ahhh... but back to the cakes... what is so great about this recipe, is that it is very versatile... you can jazz it up, and flavor it in many different ways... so if you're in the mood for a simply delicious pound cake, with a bit of a naughty side, whip up these bad boys... and make sure you give them a nice soak in that rum bath... you'll be happy you did :)
rum soaked vanilla cakes:
2 2/3 cups all-purpose flour
2 1/2 tsp baking powder
pinch of salt
2 1/3 cups of sugar
2 plump, moist vanilla beans, split lengthwise, seeds scraped out and reserved, or 1 1/2 tablespoons pure vanilla extract
6 large eggs, preferably at room temperature
2/3 cup of heavy cream
2 1/2 tbsps dark rum
1 stick plus 7 tablespoons (15 tablespoons) unsalted butter, melted and cooled
for the syrup:
1/3 cup water
1/4 cup sugar
1/4 cup dark rum, and go for the good stuff :)

prepping and getting ready:
1. center a rack in the oven and preheat the oven to 350 degrees F. Butter two 8 1/2-x-4 1/2-x-2 1/2 -inch loaf pans, dust the insides with flour and tap out the excess, (even if the pans are nonstick, it’s a good idea to butter and flour them)... then place the pans on an insulated baking sheet or on two regular sheets stacked one on top of the other

directions:
1. sift the flour, baking powder and salt together
2. put the sugar and the pulp from the vanilla beans, if using them, in a large bowl and, working with your fingers, rub them together until the sugar is moist and thoroughly imbued with the fragrance of vanilla, (if you are using vanilla extract, add it later, after you’ve added the eggs)
3. add the eggs and whisk them into the sugar, beating until they are thoroughly incorporated
4. whisk in the extract, if you are using it, then whisk in the cream, followed by the rum
5. continuing with the whisk or switching to a large rubber spatula, gently stir in the dry ingredients in 3 or 4 additions; the batter will be smooth and thick
6. finish by folding in the melted butter in 2 or 3 additions, then pour the batter into the pans, smoothing the tops with a rubber spatula.
7. bake for 55 to 60 minutes, or until a knife inserted into the center of the cakes comes out clean, (as soon as the cakes go into the oven, make the syrup)
8. after about 30 minutes in the oven, check the cakes for color–if they are browning too quickly, cover them lightly with foil tents


meanwhile, it's time to make the syrup and soak the cakes:
1. stir the water and sugar together in a medium saucepan over medium heat until the sugar melts, then bring to a boil
2. remove the pan from the heat and stir in the rum, then pour the syrup into a heatproof bowl and let cool
3. when the cakes test done, transfer them to a wire rack to cool for 5 minutes before un-molding them and turning them right side up on the rack, place the rack over a baking sheet lined with wax paper and, using a thin skewer, cake tester or thin-blade sharp knife, poke holes all over the cakes
4. then GENEROUSLY :) brush the cakes all over with the syrup, working slowly so that the cakes sop it up, and then leave the cakes on the rack to cool to room temperature

now, since this recipe makes two nice sized, and devilishly delicious pound cakes, i had to jazz them up a little... i took one and made it into a espresso and Kahlua soaked dream... tiramisu... it certainly was a booze cake if ever there was one...
and then, i had to go classic, strawberry shortcake style... layers of rum soaked goodness, sweet vanilla whipped cream and honey-balsamic soaked strawberries.... amazing :)
hope you enjoyed this bit of boozy sweetness!
and as always... happy baking everyone!

Tuesday, November 9, 2010

napoleon macarons :)

hey everyone... how you doing? well, today i'm bringing you a pretty little melt-in-your mouth treat... vanilla macarons with strawberry mousse and chocolate ganache... mmmm... sweeeeet! these lovely ladies are as much as a feast for the eyes as they are for my tummy... bit sized pieces of heaven :)

like usual, i used my go-to macaron recipe that comes from the fantastic dessert queen, "tartelette"... her desserts and treats are just simply amazing, she's an artist... one day, maybe i'll be at that caliber... fingers crossed... :)
after the macaron shells were baked to perfection (look at those cute little feet and their little round tops... adorable!), it was time to fill them...so, i then made a simple dark, bittersweet chocolate ganache and a creamy strawberry mousse...
i never get tired of these sweet treats... they are a little time consuming, but you know what.. in the end, it's so worth it... enjoy :)
happy baking everyone!

Monday, November 8, 2010

better late then never... a messy halloween cake...

this delicious mess was something i whipped up for halloween... and because on halloween you can basically get away with anything... i just went with what felt good at the moment...
and at that particular moment it was three layers of chocolate cake, peanut butter buttercream (tinted a festive halloween orange), a think smothering of marshmallow fluffy that was them burned methodically by yours truly, and then topped with a layer of warm chocolate ganache... i like how my mind works sometimes...
and the assembly was a piece of cake (take a shot for that pun)... i didn't have to whip out my pastry bags and get all fancy... just pulled out the ol' butane torch and let my devilish nature come out to play...
i was pretty happy with my choice... and now as i post these pictures, it kinda resembles a freakish egg or something on the top... hmmm... but hey... on halloween you can go as crazy as you want...

happy (late) halloween everyone, and as always... happy baking!

s'more cookies, make s'more smiles... wow... i'm really that corny :)

forgive me for that awful attempt at a funny title... i haven't even had a glass or three of wine, i was just trying to be funny... but man... what a bomb!! epic fail... oh well... but as you can see, i'm not changing the title :) i'm sticking with the shameful corniness of it all... but it's all worth it for the end result... these cookies...

these yummy, mess free s'mores... now don't get me wrong, one of the best parts about eating a s'more is how sticky you get... but with a 5 year old and a 2 year old, these are a god-send... all the deliciousness with minimal cleanup... and simple to make too!

i came across this recipe over at "
baked perfection"... and the picture just got me hooked... lucky for me i had some mini marshmallows hanging around for when the hot chocolate hankering kicks in... and this house is never without chocolate... so... let the baking begin...
s'mores cookies
adapted from "baked perfection"

1 1/2 cups all purpose flour
1 cup graham cracker crumbs
1 teaspoon baking soda
1 teaspoon salt
dash of cinnamon
1 cup (2 sticks) butter, softened
3/4 cup sugar
3/4 cup brown sugar
1 teaspoon vanilla extract
2 eggs
2 cups miniature chocolate chips
1 1/2 cups mini marshmallows
2 Hershey bars, chopped (i only had a few snack sized ones, so i added a bit more chocolate chips to the batter instead)

directions:
1. preheat oven to 375
2. in a medium bowl combine the flour, graham cracker crumbs, baking soda, salt, and dash of cinnamon
3. then, in a large bowl beat together the butter, sugar, brown sugar and vanilla extract until creamy
4. add the eggs one at a time, beating well after each addition
5. slowly beat in the flour mixture until the batter is smooth, then stir in the chocolate chips
6. drop by rounded tablespoon onto ungreased cookie sheet(mine was lined with a silocone mat)
7. let them bake for 8 minutes, then remove from the oven... push 3 to 4 marshmallows and a few pieces of hershey bar into each cookies, return to the oven and bake an additional 3-4 minutes until fully cooked
8. cool cookies and then consume
9. smile

i also apologize for the lack of luster in my photos... it was a dull and rainy day and all i had was my old camera...
oh well... but they still were yummy...
happy baking everyone!

bloglovin :)

hey people... come on and Follow my blog with bloglovin :)

Tuesday, November 2, 2010

sprinkles :)

hey everyone... check out my sister meggies sweet blog post about our trip to "sprinkles" while in chicago... it really was a sweet little treat... my favorite was the strawberry cupcake with the strawberry buttercream... it was moist, just sweet enough, and had delicious strawberry taste and aroma... and guess what new yorkers! sprinkles is rumored to be heading our way...
here's my sister enjoying a scrumptious cupcake the day before she ran the chicago marathon... oh! and by the way... she has ran 5 marathons already... and she's not even 25! that was her goal 5 by 25... and she did it... sooooooo proud of her :) and if you're up for some fantastic blog reading, follow her adventures over in greece at "jeans and tee's and travel and cake"... miss you and love you meggie :)
happy tasting and happy baking everyone!