fat bottom

fat bottom
Showing posts with label pastries. Show all posts

Tuesday, May 8, 2012

cinnamon pull apart bread

good morning everyone! i hope you all enjoyed your weekend and the beautiful weather we were blessed with yesterday... now it's raining again... booo...
anyways... so if any of you are on pinterest, and you frequent the food and drink section, i'm sure you have come across the delectable cinnamon pull apart bread... one of the best i've seen is by the fabulous "joy the baker"... i love, love her blog... check her out if you get a chance...

so... on saturday afternoon while my boys were busy pretending to be superheros, running a muck saving the universe, i set out to make us something delicious for a sunday morning treat... i love sunday mornings... i love sundays... most people dread the arrival of sunday, but for me... it's the most relaxing, most wonderful day of the week... filled with lots of food, games and crafts, maybe a hike or a fun outdoor activity, sometimes doing some kind of home improvement thingy... you know, full on family time...
so, i knew this recipe had a bit of a prep time, so i figured it would be perfect for sunday... and it was... it really was a delicious treat! a warm, comforting, sweet sunday treat!!

for the dough:
3 cups all-purpose flour
1/4 cup granulated sugar
2 1/4 teaspoons active dry yeast
1/2 teaspoon salt
2 ounces unsalted butter
1/3 cup whole milk
1/4 cup water
2 large eggs, at room temperature
1 teaspoon pure vanilla extract

for the cinnamon sugar filling:
1 cup granulated sugar
2 teaspoons ground cinnamon
1/2 teaspoon fresh ground nutmeg
2 ounces unsalted butter, melted

directions:
1. in a large mixing bowl, whisk together 2 cups flour, sugar, yeast, and salt, set aside
2. whisk together eggs and set aside
3. in a small saucepan, melt together milk and butter until butter has just melted... remove from the heat and add water and vanilla extract... let mixture stand for a minute or two, or until the mixture registers 115 to 125 degrees
4. pour the milk mixture into the dry ingredients and mix with a spatula
5. add the eggs and stir the mixture until the eggs are incorporated into the batter... it’ll look like the dough and the eggs are never going to come together, but keep stirring
6. add the remaining 3/4 cup of flour and stir with the spatula for about 2 minutes, don't worry the dough will be sticky
7. place the dough is a large, greased bowl... cover with plastic wrap and a clean kitchen towel... then place in a warm space and allow to rest until doubled in size, about 1 hour *The dough can be risen until doubled in size, then refrigerated overnight for use in the morning. If you’re using this method, just let the dough rest on the counter for 30 minutes before following the roll-out directions below 8.while the dough rises, whisk together the sugar, cinnamon and nutmeg for the filling
9. melt 2 ounces of butter, set aside and grease and flour a 9x5x3-inch loaf pan, set that aside
10. deflate the risen dough and knead about 2 tablespoons of flour into the dough, then cover with a clean kitchen towel and let rest for 5 minutes
11. on a lightly floured work surface, roll the dough out... the dough should be 12-inches tall and about 20-inches long
12. use a pastry brush to spread melted butter across all of the dough, then sprinkle with all of the sugar and cinnamon mixture
13. then slice the dough vertically, into six equal-sized strips
14. stack the strips on top of one another and slice the stack into six equal slices once again, giving you six stacks of six squares
15. layer the dough squares in the loaf pan like a book, then place a kitchen towel over the loaf pan and allow in a warm place for 30 to 45 minutes until doubled in size
16. now to bake... place a rack in the center of the oven and preheat to 350 degrees... bake for 30 to 35 minutes, until the top is very golden brown
17. remove from the oven and allow to rest for 20 to 30 minutes... run a butter knife around the edges of the pan to loosen the bread... serve while still warm, and fully enjoy the deliciousness :)
here's the dough after fully doubled, refrigerated, then brought to room temp for about 30 minutes
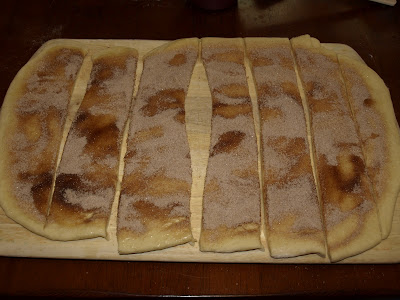
after it was rolled out, it was smeared with mealted butter, sprinkled generously with cinnamon sugar... the cut into 6 strips (i had a small strip left over... i used that one for a cinnamon roll)
the strips were then stacked...
then sliced again...
 placed in a greased loaf pan to double in size...
now it's doubled in size... time to pop this baby in the oven... i can hardly contain my excitement!  
and here it is 30 minutes later... man, would you look at the delicious masterpiece!!
a delicious close up :)

i hope you have a wonderful day... stay dry... and as always, happy baking!

Monday, July 18, 2011

sweet peaches in a yummy, yet deflated puff pastry...

afternoon all... hope everyone had a fabulous weekend... mine was rather relaxing, although a bit boring... but i was kinda in the mood for a do nothing weekend... me and my two little men had a jam packed week up in new york with the family, so when we got back in cape may i was all about doing ABSOLUTELY NADA...


the only thing i had on my mind was doing a bit of light baking... so with a bit of left over puff pastry i've had sitting in the freezer, and with some yummy summer peaches i bought at the farmers market, i decided to make a sweet little treat...

i rolled out the puff pastry, and trimmed 4 1-inch edges, and brushed them on with a bit of eggwash... then with a bit of strawberry preserves spread on the bottom, i layered on some fresh peaches... sprinkled the peaches and the edges with a bit of vanilla sugar and popped it in the oven until it was puffed up and browned... well... almost puffed up...

even though the puff factor was a bit on the sucky side of the spectrum... this was still a tasty treat... which by the way, i ate all by myself... the boys opted for italian ices...


happy baking everyone :)

Sunday, March 27, 2011

daring bakers march madness...

well hello everyone! enjoying your sunday i hope! i know i am... it's been one of those well deserved lazy days... full of just plain ol' lying around watching movies and playing with my two little guys (the toys of choice today were legos, which by-the-way are the most awful thing to step barefoot on... ugh)


anyways, as always at the end of the month it's time to reveal the highly anticipated daring bakers challenge... and this months was an interesting one... a meringue filled coffee cake... say wha?? now... i'm not a huge fan of meringue, the only type i like is in the form or dainty macarons, other then that you can keep you're lemon meringue pie for someone else... but, i'm always up for trying new things, and the pictures posted by our hosts made this delicious dish look absolutely yummy... so i put my meringue hang-ups aside and busted out the ingredients...

the challenge was co-hosted by Ria of Ria’s Collection and Jamie of Life’s a Feast.... Ria and Jamie challenged their fellow daring bakers to bake a yeasted meringue coffee cake... the recipe was actually Jamie's fathers, which was left in his collection of recipes from about 70's... and i have to say, i am SO happy she shared this family recipe... the dough was almost brioche like, with the subtle hints of cinnamon, large melty chunks of chocolate, and a meringue that was almost like a soft nougat... it all went together perfectly...


filled meringue coffee cake

*the recipe makes 2 round coffee cakes, each approximately 10 inches in diameter ingredients:


for the yeast coffee cake dough:

4 cups flour ¼ cup sugar

¾ teaspoon salt 1 package active dried yeast

¾ cup whole milk

¼ cup water (doesn’t matter what temperature)

½ cup unsalted butter at room temperature

2 large eggs at room temperature


for the meringue:

3 large egg whites at room temperature

¼ teaspoon salt

½ teaspoon vanilla

½ cup sugar


for the filling:

1 cup chopped pecans or walnuts (i omitted these)

2 tablespoons granulated sugar

¼ teaspoon ground cinnamon

1 cup semisweet chocolate chips or coarsely chopped chocolate


directions:


prepare the dough:

1. in a large mixing bowl, combine 1 ½ cups of the flour, the sugar, salt and yeast

2. in a saucepan, combine the milk, water and butter and heat over medium heat until warm and the butter is just melted

3. with an electric mixer on low speed, gradually add the warm liquid to the flour/yeast mixture, beating until well blended, increase the mixer speed to medium and beat 2 minutes, add the eggs and 1 cup flour and beat for 2 more minutes

4. using a wooden spoon, stir in enough of the remaining flour to make a dough that holds together, then turn out onto a floured surface (use any of the 1 ½ cups of flour remaining) and knead the dough for 8 to 10 minutes until the dough is soft, smooth, and elastic, keeping the work surface floured and adding extra flour as needed

5. place the dough in a lightly greased bowl, turning to coat all sides... cover the bowl with plastic wrap and a kitchen towel and let rise until double in bulk, 45 – 60 minutes

prepare your filling:

1. in a small bowl, combine the cinnamon and sugar for the filling if using, and measure out chocolate and nuts 2. once the dough has doubled, make the meringue...

3. in a clean mixing bowl – ideally a plastic or metal bowl so the egg whites adhere to the side (they slip on glass) and you don’t end up with liquid remaining in the bottom... beat the egg whites with the salt, first on low speed for 30 seconds, then increase to high and continue beating until foamy and opaque

4. add the vanilla then start adding the ½ cup sugar, a tablespoon at a time as you beat, until very stiff, glossy peaks form


now to assemble the coffee cakes:

1. line 2 baking/cookie sheets with parchment paper

2. punch down the dough and divide in half

3. on a lightly floured surface, working one piece of the dough at a time (keep the other half of the dough wrapped in plastic), roll out the dough into a 20 x 10-inch rectangle

4. spread half of the meringue evenly over the rectangle up to about 1/2-inch from the edges, then sprinkle half of your filling of choice evenly over the meringue

5. now, roll up the dough jellyroll style, from the long side. pinch the seam closed to seal

6. very carefully transfer the filled log to one of the lined cookie sheets, seam side down, bring the ends of the log around and seal the ends together, forming a ring, tucking one end into the other and pinching to seal

7. using kitchen scissors or a sharp knife (although scissors are easier), make cuts along the outside edge at 1-inch intervals, make them as shallow or as deep as desired but don’t be afraid to cut deep into the ring

8. repeat with the remaining dough, meringue and fillings

9. cover the 2 coffee cakes with plastic wrap and allow them to rise again for 45 to 60 minutes 10. preheat the oven to 350

11. brush the tops of the coffee cakes with the egg wash, then bake in the oven for 25 to 30 minutes until risen and golden brown, and the dough should sound hollow when tapped

12. remove from the oven and slide the parchment paper off the cookie sheets onto the table, very gently loosen the coffee cakes from the paper with a large spatula and carefully slide the cakes off onto cooling racks, cool

13. just before serving, dust the tops of the coffee cakes with confectioner’s sugar as well as cocoa powder if using chocolate in the filling... these are best eaten fresh, still warm the same day :)
enjoy, and happy baking everyone :)

Saturday, March 12, 2011

mallorca sweet bread... mmm... mmm... good

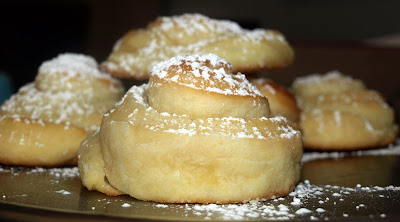
so... mallorca sweet bread... ever hear of it... it seems that most people only know of this delectable sweet from the supreme ruler of the universe, starbucks... and i hate to admit it, that's where i first came in contact with this delicious pastry... but this sweet treat isn't a starbucks creation... this is a traditional puerto rican pastry... a breakfast icon of sorts... eaten either sweet (slathered in butter and powdered sugar) or savory (sliced and stuffed with thick slices of ham, and melted cheese)...

this sweet, fluffy, eggy, almost bricohe like bread came to puerto rico via the spanish island of majorca... look at that, i'm giving you a small history and geography lesson... but enough education... lets get on to the recipe... after doing some looking around, i came across the recipe i wanted to use... from the blog "
always order dessert", it's a very tasty blog, go give it a look!

so... here's the goods:
ingredients:
2 1/4 teaspoons dry yeast
3/4 cup white sugar
5 to 6 cups all purpose flour, divided, plus more for dusting
1 cup lukewarm milk
1 cup lukewarm water
6 egg yolks
1 vanilla bean, scraped (optional)
2 sticks (1/2 pound) unsalted butter, melted and cooled to room temperature
1 teaspoon salt

directions:
1. in the base of your electric mixer, combine the warm milk, warm water, yeast, sugar, and 1 cup of flour and whisk well... leave to rise at room temperature for 45 minutes... the mixture should have risen and appear frothy and bubbly after the rise
2. whisk in the egg yolks, vanilla, and the remaining flour until it is all incorporated... whisk in the salt and 1/2 of the melted butter... cover the bowl with an oiled plastic wrap and let rise for 1 hour until doubled
3. liberally dust your surface and your hands with flour to prevent the dough from sticking... empty the dough out onto the surface and sprinkle it all over with flour... use your hands to knead it slightly... it will be soft and will feel almost liquid in the center, but you should be able to handle it by keeping your hands floured
4. divide the dough into 12 equal portions and roll each portion out into a snake about 12 inches long...use a pastry brush to coat the dough snake with a generous brush of melted butter, then coil into a little roll and place on a baking sheet lined with parchment paper
5. space the rolls out evenly, only six to a sheet so they have room to rise
6. when you're done rolling them out, brush with a little more butter and let them rise until they have doubled once again... at this time, preheat your oven to 375
7. when the breads are done rising, brush once again with the remaining butter, and bake in the oven at 375 degrees for 12-15 minutes or until golden and puffy
8. cool on a rack and dust liberally with powdered sugar just before serving


don't mind my wrinkly, unpolished and unmanicured fingers here... just look at the fluffy inside... mmm...
these were so good as a breakfast treat along with a big ol' cup of coffee... great way to start the morning
happy baking everyone!

Monday, February 14, 2011

dark chocolate and salt caramel eclairs...

so the sunday sweets craving hit me pretty hard this past weekend... and i was in the mood for something fancy... i was first thinking some kind of cake, but i am going to be surrounded by dozens of cupcakes this weekend, so i decided to pass on that... then i was thinking some kind of custard or pudding, like creme brulee or a caramely flan... then i was thinking if i was going to make a pastry-like cream, why not add it to some puff pastry and make some napoleons... but i always make napoleons, so why not change it up a bit...
do i sound like i'm rambling... i'm on severe mommy overload right now, so trying to type up something creative is making my head spin... so i'm just going to get to it... i decided to go with eclairs... yummy vanilla pastry cream wrapped up in a deliciously crispy pate a choux shell, and slathered with a ribbon on dark chocolate... delicious... really deliciously delicious...
Pierre Hermé’s cream puff dough (half recipe)
ingredients:
1/4 cup whole milk
1/4 cup water

4 T unsalted butter, cut into 4 pieces

1/8 tsp. sugar

1/8 tsp. salt

1/2 c all-purpose flour

3 large eggs, at room temperature
(you see the full recipe calls for 5 eggs, so to half this i used two whole eggs, and for the third egg i beat it a bit, then added it by the tablespoon)


directions:
1. in a heavy bottomed medium saucepan, bring the milk, water, butter, sugar and salt to the
boil
2. once the mixture is at a rolling boil, add all of the flour at once, reduce the heat to medium
and start to stir the mixture vigorously with a wooden spoon, the dough comes together very
quickly... continue stirring for about 2-3 minutes more to dry the dough, and after this time the dough will be very soft and smooth
3. transfer the dough into a bowl of a mixer fitted with the paddle attachment, add the eggs one at a time, beating after each egg has been added to incorporate it into the dough, you will notice that after you have added the first egg, the dough will separate, once again do not worry... as you keep working the dough, it will come back all together again... beat the third egg & add it a tablespoon at a time until the dough is thick and shiny and when lifted falls back into the bowl in a ribbon
4. the dough should be still warm, it is now ready to be used for the eclairs
5. preheat oven to 425 with two racks in it dividing the oven into thirds, place on a baking sheet covered with a silicone pad
6. place a pan with about a cup of water in it on the bottom rack on the oven, put the baking sheet with the dough on the top rack and bake for 10 minutes
7. turn the oven down to 350 and rotate the baking sheet, bake another 10 minutes the dough should be puffed up & brown
8. turn off the oven remove the pan with the water, use the tip of a knife to poke a small hole in each puff, and leave the tray of cooked puffs in the oven with the door ajar until cool

now i filled them with a classic vanilla pastry cream and topped them with a bittersweet chocolate ganache and a drizzle of salt caramel...


and here are some little cream puffs, topped with a deep chocolate ganache, some salt caramel and a touch of sea salt... mmmm...

hope you enjoyed this sweet installment... and happy baking everyone :)

Friday, May 7, 2010

sweet birthday wishes to my hubby...

happy birthday to my loving hubby... he turned... (gasp!) 29 this past may 4th... i spoiled him by making two desserts because he couldn't make up his mind... he originally wanted a peach cobbler... but being stealthy like i am, i quickly changed his mind for him... but i felt bad because he really wanted something fruity...

but you have to have cake on your birthday! you just have to!!

so being so sweet and pleasing i made him something fruity and something cakey!

for the cake i went with twist on dorie greenspans "devils food white out cake" and a kind of deconstructed hostess cupcake... and the result... devilishly delicious...


Devil’s Food White Out Layer Cake:
ingredients:
1 1/3 cups all purpose flour
1/2 cup cocoa powder
3/4 tsp baking soda
1/2 tsp baking powder
1/4 tsp salt
1 stick butter, room temperature
1/2 cup brown sugar
1/2 cup sugar
3 large eggs, room temperature
1 tsp vanilla extract
2 oz. bittersweet/semisweet chocolate, melted and cooled
1/2 cup buttermilk, room temperature
1/2 cup water, warm
2/3 cup chocolate chips (regular or mini)

directions:
1. preheat oven to 350F
2. grease 2 8-inch round cake pans, line the bottoms with circles of parchment paper, and butter the top of the paper
3. in a medium bowl, sift together flour, cocoa powder baking soda, baking powder and salt
In a large bowl, cream together butter and sugars until light, beat in eggs one at a time, waiting until each is incorporated (1 minute per egg) to add the next, then beat in the vanilla and the melted chocolate
4. combine buttermilk and water in a measuring cup. Working in two or three additions, alternate adding buttermilk mixture and flour mixture to the sugar mixture, scrape sides to ensure batter is even... stir in chocolate chips and divide batter into prepared pans
5. bake for 25-30 minutes, or until a tester comes out clean
6. let cakes cool in their pans for 5 minutes, then turn out onto wire racks and peel off parchment paper, cool completely

frosting/filling ingredients:
4 large egg whites, room temperature
1 cup sugar
3/4 tsp cream of tartar
1/2 cup water
1 tbsp vanilla extract

directions:
1. put the egg whites in to bowl of an electric mixer or a large bowl with a hand mixer nearby
2. combine sugar, cream of tartar and water in a small saucepan, bring to a boil and cool until syrup reaches 242F (use a candy thermometer)
3. as syrup nears correct temperature, begin to beat egg whites to soft peaks, slowly stream in the hot sugar syrup, followed by the vanilla extract.
4. beat for about 5 minutes after everything has been incorporated, or until frosting reaches room temperature

mmm... looks tasty doesn't it... yea... it was...
the cake was moist and subtly chocolaty... and the filling was so lite and fluffy that it just melted in your mouth... and the dark chocolate ganache was really the icing on the cake...

now here's the blueberry and strawberry galette... not the peach cobbler he wanted... but once he took a bite, he was in heaven... it was buttery, flaky, had a slight sugary crunch on the outside, and the little blueberries just burst with flavor when you took a bite... it was perfect...
it doesn't look perfect, rather a bit rustic... but looks can be deceiving... and that pool of blueberry goodness thats trying to escape... but don't worry, it didn't escape me... i used that on some vanilla ice cream...
look how cute and wrinkly these blueberries are...


happy birthday baby... and happy baking everyone!!

Thursday, February 25, 2010

strudel-doodle...

catching up part 3... strudel...
no real reason behind making this delicious flaky pastry... well no other reason then because i had a major hankering for one (and i rarely have a hankering for baked fruit)... and since i had some puff pastry on hand i figured why not... sometimes we just have to indulge ourselves, right?!


this was super simple to make... and you can completely tweak it to your own tastes... me, i decided to go simple with apples (2 medium sized honey crisp), cinnamon (1 1/2 tbsp), brown sugar (1/2 cup), homemade raw vanilla sugar(1-2 tsp) and some juicy plump brandy soaked raisins (about 1/4 cup, maybe more)... oh... and butter... gotta have my butter...

once all those ingredients were combined i laid them atop some thawed puff pastry... i know, i know, it's not homemade puff pastry...cause damn that stuff is a biotch to make... i will master it someday (i hope!)... so once atop the thawed and rolled out puff pastry, i sprinkled on a few cubes of salted butter (about 3 tbsps)... then i rolled the puppy up... glazed it with some melted butter (i know, most recipes say to glaze it with egg and water, or egg and milk... but i love me some butter)... and then dusted it with even more of the homemade raw vanilla sugar...


then popped it into a preheated oven and baked it till it was nice and brown and the insides were bubbly... ahh... it smelled amazing... and man, did the raisins really add some awesomeness to it... it was perfectly buttery, flaky and just something that tasted wholesome in each and every bite...

happy baking everyone!