fat bottom

fat bottom

Sunday, January 30, 2011

spicy chocolate cupcakes

well, i know the weekend is basically over, but here's a sweet and spicy sunday treat for you all... yummy fragrant cinnamon and vanilla bean cupcakes topped with a sugary-spicy chile chocolate buttercream... this was such a nice little pick me up today since i felt like i was dragging... well... that and the double espresso that accompanied it :)
cinnamon vanilla cupcakes:

dry ingredients:
1 1/4 cups all-purpose flour
1/2 tsp baking powder
1/2 tsp baking soda
1/2 tsp salt

2 tsp. cinnamon
8 tbsp (1 stick) melted butter
1 cup sugar
2 large egg whites
1 tsp vanilla extract, or 1/2 vanilla bean

1 1/8 cup vanilla nonfat yogurt

directions:
1. preheat oven to 325°F and prep cupcake tins with paper liners
2. sift together flour, baking powder, baking soda, and salt and cinnamon and set aside.
3. in mixer, beat together melted butter and sugar until combined, then add egg whites and beat until mixture is smooth and light, and then add in vanilla.
4. add flour mixture in two additions, alternating with the yogurt.
5. bake for 20-25 minutes, until cupcakes are barely golden on top, remove from oven, let cool in tins for 10 minutes, then cool on wire rack

chocolate chile buttercream


ingredients:
1 stick butter, softened
2 cups confectioners' sugar, sifted
1/4 cup heavy cream
1 teaspoon pure vanilla extract
1 teaspoon cinnamon
1 teaspoon ancho chile powder
1/2 teaspoon cayenne pepper
3 ounces bittersweet chocolate, melted and cooled

directions:
1. in a standing mixer fitted with a paddle, beat the butter until creamy
2. at low speed, beat in the confectioners' sugar, increase the speed to high and beat until fluffy, scraping down the side of the bowl, about 2 minutes longer
3. at low speed, beat in the cream, vanilla, cinnamon, ancho chile powder and cayenne, then gradually beat in the bittersweet chocolate
4. scrape down the side of the bowl and the paddle, increase the speed to medium-high and beat until light, 3 minutes longer


happy baking everyone :)

Friday, January 28, 2011

a daring bakers delight

this months daring bakers challenge was hosted by Astheroshe from the blog, "accro", and let me tell you, this was one fun challenge... our mission was to make a "Joconde imprime /entremet", sounds fancy doesn't it... well, it is french :)
so what is this joconde imprime you may ask... well... i'll tell you, and in words not written by myself:
A joconde imprime (french baking term) is a decorative design baked into a light sponge cake providing an elegant finish to desserts/torts/entremets/ formed in ring molds. A joconde batter is used because it bakes into a moist, flexible cake. The cake batter may be tinted or marbleized for a further decorative effect.
This Joconde/spongecake requires attentive baking so that it remains flexible to easily conform to the molds. If under baked it will stick to the baking mat. It over baked it will dry out and crack. Once cooled, the sponge may be cut into strips to line any shape ring mold.
Entremets (French baking term)- an ornate dessert with many different layers of cake and pastry creams in a mold, usually served cold.
so this is what i whipped up... two, 4 inch mini joconde's (i go mini now because the hubs isn't here to help me eat all the fatty goodness)... 1 was filled with two types of sweetened mascarpone (thats the one with the chocolate shavings), and the other filled with chocolate and vanilla mousse's (that's the one with the raspberries, and is more of a traditional looking joconde/entremet)...
well... enjoy these, i know i sure did, my thighs on the other hand did not... :(
chocolate piping batter, makes about 2 cups

ingredients:
1 stick unsalted butter, cut into pieces, room temperature
1 cup confectioners' sugar, sifted
4 large egg whites, room temperature
1/4 teaspoon pure vanilla extract
3/4 cup plus 1 tablespoon all-purpose flour
1/3 cup unsweetened Dutch-process cocoa powder, sifted

directions
1. process butter and confectioners' sugar in a food processor until fluffy, while machine is running, gradually add egg whites and vanilla, and scrape down sides of bowl, add flour, and process until combined
2. transfer to a bowl, and stir in cocoa powder with a rubber spatula
3. for piping, transfer to a pastry bag fitted with a 1/16-inch plain round tip (such as Ateco #2), piping batter can be refrigerated in an airtight container for up to 3 days; bring to room temperature and stir before using

4. atop a piece of parchment paper, pipe any design you would like, like curls or anything your pretty little heart desires, then freeze for about 15 minutes while making the joconde

Joconde Sponge, makes two ½ size sheet pans or a 13” x 18” jelly roll pan

ingredients:
¾ cup almond flour
½ cup plus 2 tablespoons confectioners sugar
¼ cup cake flour
3 large eggs

3 large egg whites
2½ tsp. sugar or superfine (caster) sugar
2 tbsp. unsalted butter, melted

directions:
1.in a clean mixing bowl whip the egg whites and white granulated sugar to firm, glossy peeks, reserve in a separate clean bowl to use later
2. sift almond flour, confectioner’s sugar, cake flour
3. on medium speed, add the eggs a little at a time, mix well after each addition, mix until smooth and light
4. fold in one third reserved whipped egg whites to almond mixture to lighten the batter, fold in remaining whipped egg whites, *do not over mix
5. fold in melted butter
6. pour the Joconde batter over the design, spread evenly to completely cover the pattern
7.Bake at 475ºF until the joconde bounces back when slightly pressed, for about 5 minutes, it is a very quick bake, so watch carefully
8. cool but do not leave too long, or you will have difficulty removing it from mat
9. flip cooled cake on to a powdered sugared parchment paper, remove silpat, cake should be right side up, and pattern showing, the powdered sugar helps the cake from sticking when cutting


looks good in there, doesn't it... oh yea...


and here's my little man, ben... my 2 year old enjoying a joconde... haha... makes me smile
get daring! and happy baking everyone!

Wednesday, January 19, 2011

the baked brownie... need i say more...

listen... i could go into a huge schpeeal (is that how you spell it?) about why i made these, and i could write a paragraph or two describing their awesomeness... but i certainly will not... all i am going to say is... holy cow... i am in brownie heaven... and if you're a brownie or choco-holic you must stop what you are doing and make these... NOW... GO... stop reading... preheat your oven and mix up the batter... GO! NOW!!

the Baked Brownie
From Baked: New Frontiers in Baking
ingredients:
1-1/4 cups all purpose flour
1 tsp salt
2 tbsp dark unsweetened cocoa powder
11 oz dark chocolate, coarsely chopped
1 cup (2 sticks) unsalted butter, cut into 1 inch pieces
1 tsp instant espresso powder
1-1/2 cups granulated sugar
1/2 cup firmly packed light brown sugar
5 large eggs, at room temperature
2 tsp pure vanilla extract

directions:
1. preheat oven to 350 degrees
2. butter the sides and bottom of a 9x13 baking pan (i didn't have one on hand, so my brownies were a little thicker)
3. in a medium bowl, whisk together the flour, salt, and cocoa
4. put the chocolate, butter, and instant espresso powder in a large bowl and set over a saucepan of simmering water, stirring occasionally until the chocolate and butter are completely melted and smooth
5. turn off the heat, but keep the bowl over the water and add the sugars. Whisk until completely combined, then remove the bowl from the pan, and allow mixture to come to room temperature
6. add 3 eggs to the chocolate mixture and mix until combined. Add the remaining eggs and whisk until combined.
7. add the vanilla and stir until combined, do not overbeat the batter at this stage or brownies will be cakey
8. sprinkle the flour mixture over the chocolate mixture and using a spatula (not a whisk), fold the flour mixture into the chocolate until just a bit of the flour mixture is visible
9. pour the batter into the pan and smooth the top
10. bake in the center of the oven for 30 minutes, rotating pan halfway through, until toothpick inserted comes out clean
11. let the brownies cool completely, then cut them into squares
12. enjoy and savour each bite of heaven... :)

happy happy baking everyone!!

Monday, January 17, 2011

vanilla cupcakes with honey-vanillabean buttercream

hello everybody! i hope everyone is enjoying their three day weekend, and for anyone who wasn't off today, sorry :) anyways... here's a delicious little cupcake that i had to share...

for a while i have been looking around for a new go to vanilla cake recipe... don't get me wrong, i love the one i've been using, but i'm looking for something that takes a little less time to prep...

i decided to try a brilliant cake recipe but in cupcake form... i've made this cake before, and it is just heavenly... i'm talking about dorie greenspan's "perfect party cake"... this cake is just down right awesome... it bakes up perfect every time, and holds it own against any variety of frosting you throw at it...

dorie greenspan'sn perfect party cake:
ingredients:

2 1/4 cups cake flour
1 tablespoon baking powder
1/2 teaspoon salt
1 1/4 cups whole milk or buttermilk
4 large egg whites
1 1/2 cups sugar
2 teaspoons grated lemon zest
1 stick (8 tablespoons) unsalted butter, at room temperature
1/2 teaspoon pure lemon extract

directions:
1. preheat the oven to 350, and prep cupcake pans with liners
2. sift together the flour, baking powder and salt
3. whisk together the milk and egg whites in a medium bowl
4. put the sugar and lemon zest in a mixer bowl or another large bowl and rub them together with your fingers until the sugar is moist and fragrant
5. add the butter and, working with the paddle or whisk attachment, beat at medium speed for a full 3 minutes, until the butter and sugar are very light... beat in the extract, then add one-third of the flour mixture, still beating on medium speed
6. beat in half of the milk-egg mixture, then beat in half of the remaining dry ingredients until incorporated, add the rest of the milk and eggs, beating until the batter is homogeneous, then add the last of the dry ingredients
7. finally, give the batter a good 2-minute beating to ensure that it is thoroughly mixed and well aerated, then divide the batter evenly into cupcake tins
8. bake for about 20 minutes, or until the cupcakes are well risen and springy to the tough – a toothpick inserted into the centers should come out clean, transfer to cooling racks and cool for about 5 minutes, then remove from tins

i decided to top these little beauties with a delicious, yet a little tedious buttercream that i have been aching to try... i'm talking about baked's honey-vanilla buttercream... it takes a while to make, but i was sooooo pleased with the outcome... just plain delicious... smooth and buttery that leaves just a slight honey finish on your tongue...

honey vanillabean buttercream
ingredients:

1 1/2 cups sugar
1/2 cup all-purpose flour
1 1/2 cups whole milk
1/3 cup heavy cream
24 Tbsp. (3 sticks) unsalted butter , softened
3 Tbsp. honey
1 tsp. vanilla extract (i used vanilla bean paste
directions:
1. in a heavy, medium saucepan, whisk sugar and flour until well blended
2. add milk and cream and whisk until smooth
3. set pan over medium heat and cook, stirring constantly with a heatproof rubber spatula, until mixture thickens and comes to a boil, about 12 minutes
4. reduce heat to low and cook, stirring, for 2 minutes, then pour into a bowl and let cool completely, about 1 hour
5. in a stand mixer with paddle attachment, beat butter on medium speed until fluffy
6. gradually beat in cream-flour mixture, about 1/3 cup at a time, beating until blended with butter
7. beat on medium-high speed until fluffy and smooth, about 1 minute, beat in honey and vanilla
8. refrigerate until buttercream holds its shape and is thick enough to spread, about 20 minutes
9. pipe your cupcakes to your hearts desire... then devour each tasty crumb :)
happy cupcakin' everybody!

Thursday, January 13, 2011

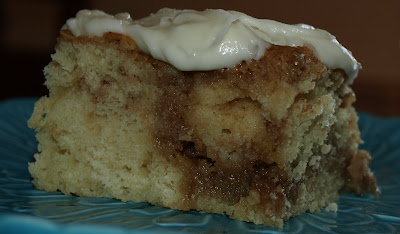
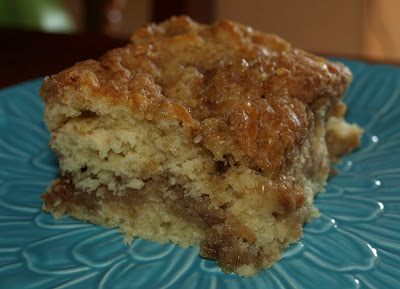
i just couldn't help myself :) i just had to make the cinnamon roll cake

well, if you're hip to the baking scene i'm pretty sure you've seen this cake floating around recently... i present the devilishly delicious cinnamon roll cake... and like everyone else who baked this up, i have nothing but praise for this sweet and spicy goodie... it's light, tender, and satisfies that cinnamon roll craving without having to wait for the yeast to double and rise...
so... if you have a few free moments and you want to fill your belly with something really warm and delicious, get your tushie in the kitchen and bake this right away... you will not be disappointed :)

cinnamon roll cake (from the blog, the girl who ate everything):
cake ingredients:
3 cups flour
¼ teaspoon salt
1 cup sugar
4 teaspoons baking powder
1 ½ cups milk
2 eggs
2 teaspoons vanilla
1/2 cup butter, melted

topping/ filling recipe:
1 cup butter, softened
1 cup brown sugar
2 tablespoons flour
1 tablespoon cinnamon

directions:
1. preheat oven to 350 degrees and grease a 9x13 inch baking pan
2. with an electric mixer or stand mixer mix the flour, salt, sugar, baking powder, milk, eggs and vanilla
3. once well combined, slowly stir in the 1/2 cup melted butter
4. pour batter into a greased pan

now for the topping/filling:
5. in a large bowl, mix the 2 sticks of softened butter, brown sugar, flour, cinnamon until well combined
6. drop evenly over cake batter by the tablespoonfuls and use a sharp edge of a knife to swirl the topping through the cake
7. bake for 25-30 minutes or until toothpick comes out nearly clean from center
8. cool, but best served warm :)

most people who made this cake glazed it, but i just couldn't resist the classic cinnamon roll topping... a slightly sweet cream cheese frosting... i mean come on, how do you not use cream cheese frosting on a cake like this... man... it was fantastic :)


happy baking everyone!

Tuesday, January 4, 2011

oh my gosh! i forgot the bananas!

so... how many of you have heard of the Brooklyn based bakery "Baked"?, or have heard of their extremely popular and fabulous book "Baked: New Frontiers in Baking" and the amazing follow up "Baked Explorations"... well if you haven't you have been living under one seriously large rock... these guys really know their goodies...

well this christmas, my hubby who has exceptionally good taste...well, that's because i steer him in the right direction most of the time :)... but anyways, as i was saying... my hubs gave me the latter of these two amazing books... i spent a good portion of the morning drooling over the delicious pictures... and was very excited to return from christmas break to get cracking at some of these recipes... but which recipe to start off with... which one...

well, on the night we returned home from our christmas vacation we happened to be flipping through the tv and what happened to be on... throw-down with bobby flay... and take a gander at who he was challenging... the fellas from baked... and the dish they were whipping up... banana cream pie... which happens to be one of the hubbys favorite things in the world...

dude... it was like the stars were aligned... and i just had to make this for the hubs... you see, he was about to leave for three months for school (mandatory before he gets underway on the boat we are going to be stationed at next summer)... so for the dessert portion of our new years eve feast i whipped up the baked version of banana cream pie... you see... they cover theirs with a luscious layer of peanut buttery whipped cream...

and let me tell you something... something i hate to admit... I FORGOT THE LAYER OF BANANAS... what a dope!! :) come on! who forgets the bananas in a banana cream pie... sheesh!

so now it was just a crunchy cookie crust, layered with a yummy vanilla bean pudding, and topped with the peanut butter whipped cream... and you know what... it was still lip smacking good... i ended up just slicing the bananas and kinda threw 'em atop all higgety piggety...

ingredients:
for the cookie crust:
6 ounces of vanilla wafer cookies
6 tablespoons (3/4 stick) chilled unsalted butter, cut into 1/2-inch cubes
2 tablespoons sugar

for the vanilla pudding filling:
1/3 cup sugar
1 1/2 tbsp cornstarch
1/8 tsp salt
1 cup heavy whipping cream
1/2 cup whole milk
2 large egg yolks
1 vanilla bean, split lengthwise
1 tbsp unsalted butter
4 firm but ripe bananas, peeled, divided
3 tablespoons orange juice, divided

for the peanut butter layer:
3 ounces cream cheese, room temperature
1/2 cup powdered sugar
1 tsp vanilla extract
1/3 cup creamy peanut butter (do not use old-fashioned or freshly ground)
2/3 cup chilled heavy whipping cream

directions:
for the vanilla wafer crust:

1. preheat oven to 350
2. combine all ingredients in processor; blend until mixture resembles moist crumbs
3. transfer to 9-inch-diameter glass pie dish and press mixture onto bottom and up sides (not rim) of dish
4. bake crust until golden brown, about 12 minutes, remove from oven; press crust with back of spoon if puffed and cool crust completely

for the vanilla pudding filling:
1. whisk sugar, cornstarch, and salt in heavy medium saucepan until no lumps remain
2. gradually whisk in cream, then milk
3. add yolks and scrape in seeds from vanilla bean; whisk to blend
4. cook over medium heat, whisking constantly, until pudding thickens and boils, about 5 minutes
5. add butter and stir until melted, spread warm pudding in cooled crust and chill until filling is cool, about 1 hour

thinly slice 3 bananas on diagonal, combine banana slices and 2 tablespoons orange juice in medium bowl; toss to coat... transfer banana slices to paper towels and pat dry, arrange enough banana slices in single layer over vanilla custard filling to cover completely

for the peanut butter layer:
1. using electric mixer, beat cream cheese and powdered sugar in medium bowl until smooth
2. beat in vanilla, then peanut butter
3. beat the heavy cream in another medium bowl until firm peaks form, fold large spoonful of whipped cream into peanut mixture to loosen, then fold in remaining cream in 2 additions
4. spread peanut butter layer evenly over bananas then chill at least 3 hours
5. DEVOUR :)


just look at that yummy peanut butter whipped cream... sooooooo gooooooooood!

well... happy baking everyone! and remember... don't forget the bananas!

Sunday, January 2, 2011

who doesn't want cupcakes!

so this christmas, instead of giving out gift cards to my sons teachers, i decided to go a little more homemade... with... surprise! cupcakes! i know i know, thinking way outside the box here!!! :)
so i decided to make a yummy variety of delicious goodies... i made some vanilla chai spice cupcakes, some caramel macchiato cupcakes, some classic vanilla bean cupcakes, some vanilla bean caramel crunch cupcakes, and some spicy hot chocolate cupcakes...
i enjoyed pulling my little butane torch out and toasting these little mini marshmallows, and then to make it "hot" chocolate, i sprinkled them with some chili pepper... mmm.....
well, i thought they were a nice gift... wouldn't you enjoy getting some of these bad boys?
well... as always my readers... happy baking!!

it was one of those "i just had to make a cake" days

hello everyone! well... here's a bit of what i've been up to... i've been super busy... but i have been making time to bake, just not enough time to blog... but it seems like the dust has settled and now i should be able to play catch up... so here we go...
this is a cake is well, simply put, an attack of a chocolate craving cake... i mean, the chocolate bug bit me something fierce the other day, and i just couldn't fight back... now i could have gone the easy route and bought some store baked-chemical filled-chocolate flavored something, but i couldn't... so at around 5 pm i got down to baking... it was kind of a slap happy mess... but it was just what the doctor ordered... and man, i don't know what it was, but this cake was super duper moist (yuck! i hate that word)...

now what you are seeing inside are 4 layers of deep dark chocolate cake, layered with some rich and creamy strawberry mousse, along with a classic vanilla buttercream... just look at how (cringing as i say the word) moist (eekkk) this cake is...

and believe me, i know it's not the most professional looking cake, but i was in such a eat the cake right now mood... heck, i was lucky to even finish icing and decorating it... i mean look at the cake, it was inviting me to eat it... and being the nice girl that i am, i just had to oblige :)


well... hope you enjoyed this tasty morsel...
happy baking everyone!