fat bottom

fat bottom

Tuesday, May 8, 2012

cinnamon pull apart bread

good morning everyone! i hope you all enjoyed your weekend and the beautiful weather we were blessed with yesterday... now it's raining again... booo...
anyways... so if any of you are on pinterest, and you frequent the food and drink section, i'm sure you have come across the delectable cinnamon pull apart bread... one of the best i've seen is by the fabulous "joy the baker"... i love, love her blog... check her out if you get a chance...

so... on saturday afternoon while my boys were busy pretending to be superheros, running a muck saving the universe, i set out to make us something delicious for a sunday morning treat... i love sunday mornings... i love sundays... most people dread the arrival of sunday, but for me... it's the most relaxing, most wonderful day of the week... filled with lots of food, games and crafts, maybe a hike or a fun outdoor activity, sometimes doing some kind of home improvement thingy... you know, full on family time...
so, i knew this recipe had a bit of a prep time, so i figured it would be perfect for sunday... and it was... it really was a delicious treat! a warm, comforting, sweet sunday treat!!

for the dough:
3 cups all-purpose flour
1/4 cup granulated sugar
2 1/4 teaspoons active dry yeast
1/2 teaspoon salt
2 ounces unsalted butter
1/3 cup whole milk
1/4 cup water
2 large eggs, at room temperature
1 teaspoon pure vanilla extract

for the cinnamon sugar filling:
1 cup granulated sugar
2 teaspoons ground cinnamon
1/2 teaspoon fresh ground nutmeg
2 ounces unsalted butter, melted

directions:
1. in a large mixing bowl, whisk together 2 cups flour, sugar, yeast, and salt, set aside
2. whisk together eggs and set aside
3. in a small saucepan, melt together milk and butter until butter has just melted... remove from the heat and add water and vanilla extract... let mixture stand for a minute or two, or until the mixture registers 115 to 125 degrees
4. pour the milk mixture into the dry ingredients and mix with a spatula
5. add the eggs and stir the mixture until the eggs are incorporated into the batter... it’ll look like the dough and the eggs are never going to come together, but keep stirring
6. add the remaining 3/4 cup of flour and stir with the spatula for about 2 minutes, don't worry the dough will be sticky
7. place the dough is a large, greased bowl... cover with plastic wrap and a clean kitchen towel... then place in a warm space and allow to rest until doubled in size, about 1 hour *The dough can be risen until doubled in size, then refrigerated overnight for use in the morning. If you’re using this method, just let the dough rest on the counter for 30 minutes before following the roll-out directions below 8.while the dough rises, whisk together the sugar, cinnamon and nutmeg for the filling
9. melt 2 ounces of butter, set aside and grease and flour a 9x5x3-inch loaf pan, set that aside
10. deflate the risen dough and knead about 2 tablespoons of flour into the dough, then cover with a clean kitchen towel and let rest for 5 minutes
11. on a lightly floured work surface, roll the dough out... the dough should be 12-inches tall and about 20-inches long
12. use a pastry brush to spread melted butter across all of the dough, then sprinkle with all of the sugar and cinnamon mixture
13. then slice the dough vertically, into six equal-sized strips
14. stack the strips on top of one another and slice the stack into six equal slices once again, giving you six stacks of six squares
15. layer the dough squares in the loaf pan like a book, then place a kitchen towel over the loaf pan and allow in a warm place for 30 to 45 minutes until doubled in size
16. now to bake... place a rack in the center of the oven and preheat to 350 degrees... bake for 30 to 35 minutes, until the top is very golden brown
17. remove from the oven and allow to rest for 20 to 30 minutes... run a butter knife around the edges of the pan to loosen the bread... serve while still warm, and fully enjoy the deliciousness :)
here's the dough after fully doubled, refrigerated, then brought to room temp for about 30 minutes
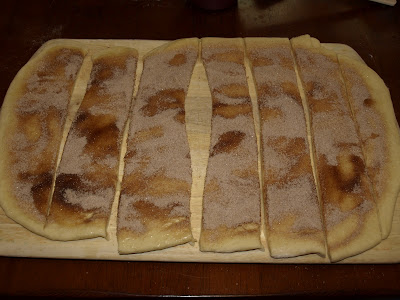
after it was rolled out, it was smeared with mealted butter, sprinkled generously with cinnamon sugar... the cut into 6 strips (i had a small strip left over... i used that one for a cinnamon roll)
the strips were then stacked...
then sliced again...
 placed in a greased loaf pan to double in size...
now it's doubled in size... time to pop this baby in the oven... i can hardly contain my excitement!  
and here it is 30 minutes later... man, would you look at the delicious masterpiece!!
a delicious close up :)

i hope you have a wonderful day... stay dry... and as always, happy baking!

Friday, May 4, 2012

meyer lemon bars... a taste of spring on a rainy day + a birthday wish


hey everyone... its been awhile... and a lot has been going on over here... i recently returned from an amazing 2 week vacation in France... and i had a fantastic time... the people, the sights, the food and wine... i can't wait to go back :)

i'll post some some pictures soon... but heres just one quick picture of me and my sister


the weather in maine has been very dreary lately.... rain and grey grey skies...not the type of weather that puts a smile on my face, and basically drains me of any and all energy... but i figured something like sunny sweet lemon bars would certainly brighten my day...
and they did :)
is there nothing better then a sweet shortbread crust and subtly sweet and tangy lemon filling...


for the crust: 1/2 pound unsalted butter, at room temperature
1/2 cup granulated sugar
2 cups flour
1/8 teaspoon kosher salt
for the lemon filling:
4 extra-large eggs at room temperature
1 2/3 cups granulated sugar
1 tablespoon + 1 teaspoon grated meyer lemon zest (3 to 4 lemons)
2/3 cup freshly squeezed lemon juice
2/3 cup flour
+ confectioners’ sugar, for dusting

directions:
1. preheat the oven to 350 degrees and grease a 9 by 13 by 2-inch baking pan
2. for the crust: cream the butter and sugar until light in the bowl of an electric mixer fitted with the paddle attachment
3. combine the flour and salt and, with the mixer on low, add to the butter until just mixed
4. place the dough onto a well-floured board and gather into a ball, then flatten the dough with floured hands and press it into the greased baking sheet, building up a 1/2-inch edge on all sides
5. bake the crust for 15 to 20 minutes, until very lightly browned... cool on a wire rack
6. for the lemon layer: whisk together the eggs, sugar, lemon zest, lemon juice, and flour
7. pour over the crust and bake for about 22-25 minutes, or about five minutes beyond the point where the filling is set... then let cool to room temperature
8. cut into rectangles and dust with confectioners’ sugar


and now to wish my amazing hubby a very happy birthday :)
 unfortunately he's underway right now... but he'll be home shortly and we can celebrate then... it's been a hectic few months as a family... not being together for more than a few days at a time really sucks, but soon enough we'll be together again...
and that is something i am really looking forward to :)
i love you hubby!!

happy baking everyone... and a very happy birthday to my hubs

Friday, March 30, 2012

cake batter rice krispie treats... and a guest blogpost


 happy Friday everyone... i am absolutely thrilled that it's the weekend already... the week countdown until my hubby comes home has begun... the little guys are so excited for his return... i think they are even more excited for the following week when i go to France for 12 days leaving the three of them to do lots of fun boy stuff... as my oldest Jack keeps saying "we are going to rock the house out mom!"... oh lord, i can only imagine... my hubs has never spent more than 1 day/night by himself with both of the boys... i've already made a very detailed (color coated) schedule so the hubs has a bit of a heads-up... sometimes it's like i have 3 kids (just kidding)...

so... i saw this recipe on pinterest the other day, and being that it only took about 5 minutes to make and consisted of about 5 ingredients, i figured i would give it a go... the only thing was that i had to buy a box of yellow cake mix.. i cannot remember the last time i bought cake mix... but since the reviews of these treats were raving... i got myself to the store and bought myself a box of duncan hines yellow butter cake mix...
and as for these treats... the reviews were spot on... they were sooooo good...what a fun way to amp up rice krispie treats!
cake batter rice krispie treats:
ingredients:

3 Tbsp. butter
1 (10 oz.) bag of mini-marshmallows
1/3 cup yellow cake mix (the dry cake mix, not prepared into a batter!)
6 cups crispy rice cereal
a few dashes of cinnamon
sprinkles

directions:
1. melt and brown butter in a large saucepan over low heat and add marshmallows, and stir until they begin to melt, and dash in a bit of cinnamon
2. begin adding in the cake mix one spoonful at a time so its combined
3. stir in the cereal, and mix it so it is completely coated with marshmallow mixture
4. press into a baking dish and top with sprinkles... then let  them sit for about 30 minutes before cutting

and i have a great announcement... starting today, my sister and i will be collaborating on her amazing blog "Jeans and Tees and Travel and Cakes"... so check me out every Friday where i will be sharing more amazing, fun and delicious goodies


until next time... happy baking everyone :)

Tuesday, March 20, 2012

tiramisu... oh! how i love you...

hello hello... good afternoon or evening everyone :) here's a delicious post for you... homemade tiramisu... is there anything better, like seriously... it's like one of the sexiest desserts out there...

i love making this dessert... whether it is in cake form, cupcake form, in trifle form... it's just amazing...what i've never done before though is make it with homemade ladyfingers... i love making it with angel food cake... and i hate to admit this, i may be guilty of purchasing store bought ladyfingers...
but i vow to you here and now, i will never ever EVER purchase those again...

i layered the ladyfingers on the bottom of the pan... drizzled them with espresso, then with sweet billowy kahlua infused mascarpone, chopped chocolate chunks... then repeat until you just cant fit anymore in the dish... then finally, i topped it with sweetened vanilla bean whipped cream and sprinkles of cinnamon and cocoa powder...

 how does that sound... pretty darn amazin!

homemade ladyfingers:
ingredients:

1/2 cup powdered sugar for dusting the ladyfingers, plus extra for dusting the baking sheets
7 large eggs, separated
3/4 cup plus 4 tablespoons granulated sugar
2 teaspoons vanilla extract
1 cup all-purpose flour

directions:
1. preheat the oven to 375 degrees, then line two 12 x 17-inch baking sheets with parchment paper or silicon mats
2. use a fine-mesh sieve to dust the paper with a light coating of powdered sugar
3. using a mixer fitted with a paddle attachment, beat the egg yolks, the 3/4 cup granulated sugar, and the vanilla in a large bowl on high speed about 5 mintues, until the yolks become thick and pale yellow
4. in a separate clean, large bowl, use a mixer fitted with a whisk attachment to beat the egg whites on high speed until stiff peaks form... then add the 4 tablespoons granulated sugar, 1 tablespoon at a time, beating after each addition
5. fold the egg white mixture gently into the egg yolk mixture, use a sieve to gently sift the flour over the batter and gently fold in the flour just until incorporated
6.spoon the batter into a pastry bag fitted with a large round tip, then pipe the batter onto the prepared baking sheets, making each ladyfinger about 4 inches long and 2 inches wide... then bake about 10 minutes, until lightly browned
7. sift the 1/2 cup powdered sugar over the ladyfingers just as they come out of the oven... cool for 5 minutes and use a spatula to transfer them from the baking sheet to the cooling racks
  

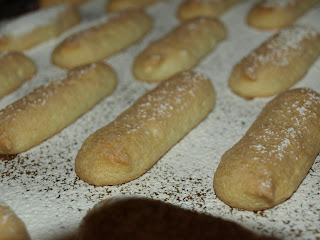
little ladyfingers all piped and sprinkled with confectioners sugar...

nice and crispy and spongy after a quick bake in the oven... i am never buying store bought ladyfingers ever again...

i put it together in a bread/loaf pan... next time i am going all out and use a spring form pan to make it look more clean and professional... but you know what, it was just for me... so i kept it simple


happy baking everyone :)

Monday, February 27, 2012

snickerdoodles... what a fun word to say...

i have a confession to make... i, in all my years of baking, have never made snickerdoodles... i don't know why... it's not that i don't like cinnamon... i love it... sprinkled on pancakes, waffles, in my coffee, in hot cocoa, in cupcakes and in brownies, for heavens sake... cinnamon rolls!!!

so...what was holding me back from making snickerdoodles... i have no freakin' idea... just me being lame i guess :)

now i didn't go looking for a specific snickerdoodle recipe... i just used my favorite sugar cookie recipe, sprinkled some cinnamon into the cookie dough... then rolled the dough into a mix of cinnamon, light brown sugar and raw sugar...
the result... a delicious fragrant cinnamon cookie coated with a crunchy cinnamon sugar coating... perfect with tea... perfect with coffee... perfect when crumbled on top of vanilla bean ice cream... just perfect...


and as always... happy baking to you all :)

Saturday, February 11, 2012

funky lookin homemade pretzels


hey everyone... it's saturday afternoon here... it's been a  pretty low key day here in the Perkins house... just lots of legos, action figures and some movies...the boys are busy watching the movie "real steel" which is super cute and at the heart of it is a touching story... not to mention it stars hugh jackman, that man candy gives me something to stare at... his muscles are quite drool worthy...
but anyways... i needed something to do... the laundry was done, the bedrooms were all straightened up, and dinner was in the crock pot... and the pages on pinterest were starting to blur... so... i looked through some of the recipes i had pinned... and found a simple pretzel recipe that had recieved rave reviews from the other readers... so... now i had something to do...

for the pretzels
ingredients:

1 cup of
1 pkg. yeast, or 2 1/4 tsp active dry yeast
3 tbsp. light brown sugar, packed
2 1/4 cups all purpose flour, and more for kneading
2 tbsp. of softened unsalted butter
1 tsp. salt
1/3 cup baking soda
3 cups of warm water

directions:
1. warm the milk in a saucepan over medium heat until it reaches about 110, then add the milk into a bowl and add the yeast to the milk to soften and bloom...
2. add the brown sugar and 1 cup of the flour to the milk mixture, and stir with a wooden spoon (or you can use a standing mixer with a dough hook attachment... which is what i did)
3. then add the softened butter, mixing in well... then finally add the rest of the flour... the dough should be smooth and slightly tacky...
4. place the dough into a lightly greased bowl, cover with plastic wrap and let it rise in a warm place until doubled in size (about 1 hour)
5. once the dough is doubled, punch down and knead on a floured surface... divide the dough into six equal pieces... roll and stretch each piece into a 30 inch rope... then shape it into a pretzel shape (try your best!!)
6. dissolve the baking soda in the warm water in a shallow dish, and gently dip each pretzel in the soda solution, sprinkle with salt, and then arrange on a baking sheet and bake for 10-12 minutes until golden brown... then cool slightly, and enjoy...
mr. pretzel face :)

i kinda gave up on the classic pretzel shape... well, actually... it kicked my ass... i just couldn't get it to work for me... but i really don't care too much because they are delicious no matter what shape they are in... i'm serious, these pretzels were so good... a salty crust, and a sweet soft doughy center... the boys and i have been snacking on them since they were cool enough to eat...


well.. go and enjoy the rest of your weekend... and as akways...

happy baking everyone...

Wednesday, February 8, 2012

homemade lofthouse cookies and a birthday boy

hey everyone... happy hump day, and i hope everyone is enjoying their week so far... it's certainly been a busy stressful few weeks here...
firstly, my littlest guy had to get his tonsils and adenoids out... the little dude and i had to stay over night in the hospital, which i was happy to do because he was very grouchy and refusing his meds... and that didn't stop once we went home, oh no... it was 2 weeks of crankiness of which the likes i have never known... he wouldn't eat, wouldn't drink, wouldn't take any meds... bedtime was a disaster, up every few hours in agony crying and saying he had "boo boo's in my frooat"... my poor little man... but little by little he started to come back to his little rascally ways...
and on top of all that craziness... my hubby was getting ready to get underway again, he'll be away for another 2 months... so he'll be back in april... blaaahhh...
so...in other news, big news (well for me anyways), my little guy also just turned three... three... i still can't wrap my mind around that... honestly, it feels like he has been here forever... he just is the cutest, goofiest, little blue eyed dimpled hooligan... and i'm so blessed to have him as my son...
when i asked the little man what dessert he wanted for his birthday, he replied "cookies"... what type of cookies i asked... "blue cookies" he said very matter of factly... well... after two weeks of him being in misery, i was ready to give him anything he wanted, he needed a good cheering up... so... blue cookies it was...
so... i opted to make some homemade lofthouse style cookies... you know lofthouse cookies... those additively delicious soft and buttery, can't be good for you cookies... the ones that are boasted to stay fresh for almost a month... seriously, they'll last through the apocalypse along with twinkies...
so.. i baked up a batch and topped with baby blue buttercream...
and the birthday boy couldn't have been any happier :)


homemade lofthouse cookies (i cut the recipe in half)
ingredients:
6 cups all purpose flour
1 tsp. baking soda
1 tsp. baking powder
1 cup butter (2 sticks) at room temperature
2 cup granulated sugar
3 eggs
2 tsp. vanilla extract
1 1/2 cup sour cream

directions:
1. in the bowl of a stand mixer with the flat beater attached, cream the butter and granulated sugar at medium speed until light and fluffy, about 3 minutes... scrape down the sides of the bowl with a rubber spatula as needed
2. add the eggs, one at a time beating until each incorporated... then add the vanilla and sour cream and beat at low speed until combined
3. add the dry ingredients and beat at low speed until just combined, scraping down the bowl as needed... then divide the dough into two sections, and flatten into rectangles then wrap with plastic wrap... chill the dough in the refrigerator overnight or at least two hours until firm
4. preheat the oven to 425 degrees, and line 2 large baking sheets with silicon mats, or parchment paper or even spray them with nonstick cooking spray, set aside
5. on a floured surface, using a rolling pin, roll the dough out to 1/4-inch thickness... using a 2 1/2-inch round cookie cutter, cut out circles and transfer to a baking sheet... bake for 7 minutes, until pale golden... and then immediately transfer cookies to a wire rack to cool


happy birthday to my little benjamin scout... we love you so

and as always... happy baking everyone